
- If a patient is known to have formed a red cell alloantibody, each new sample must be tested to exclude the formation of further alloantibodies.
- The setup of a panel for antibody identification is discussed in the previous topic. Here, we will discuss how to interpret an red cell antibody identification panel.
Standard Antibody Identification Panels
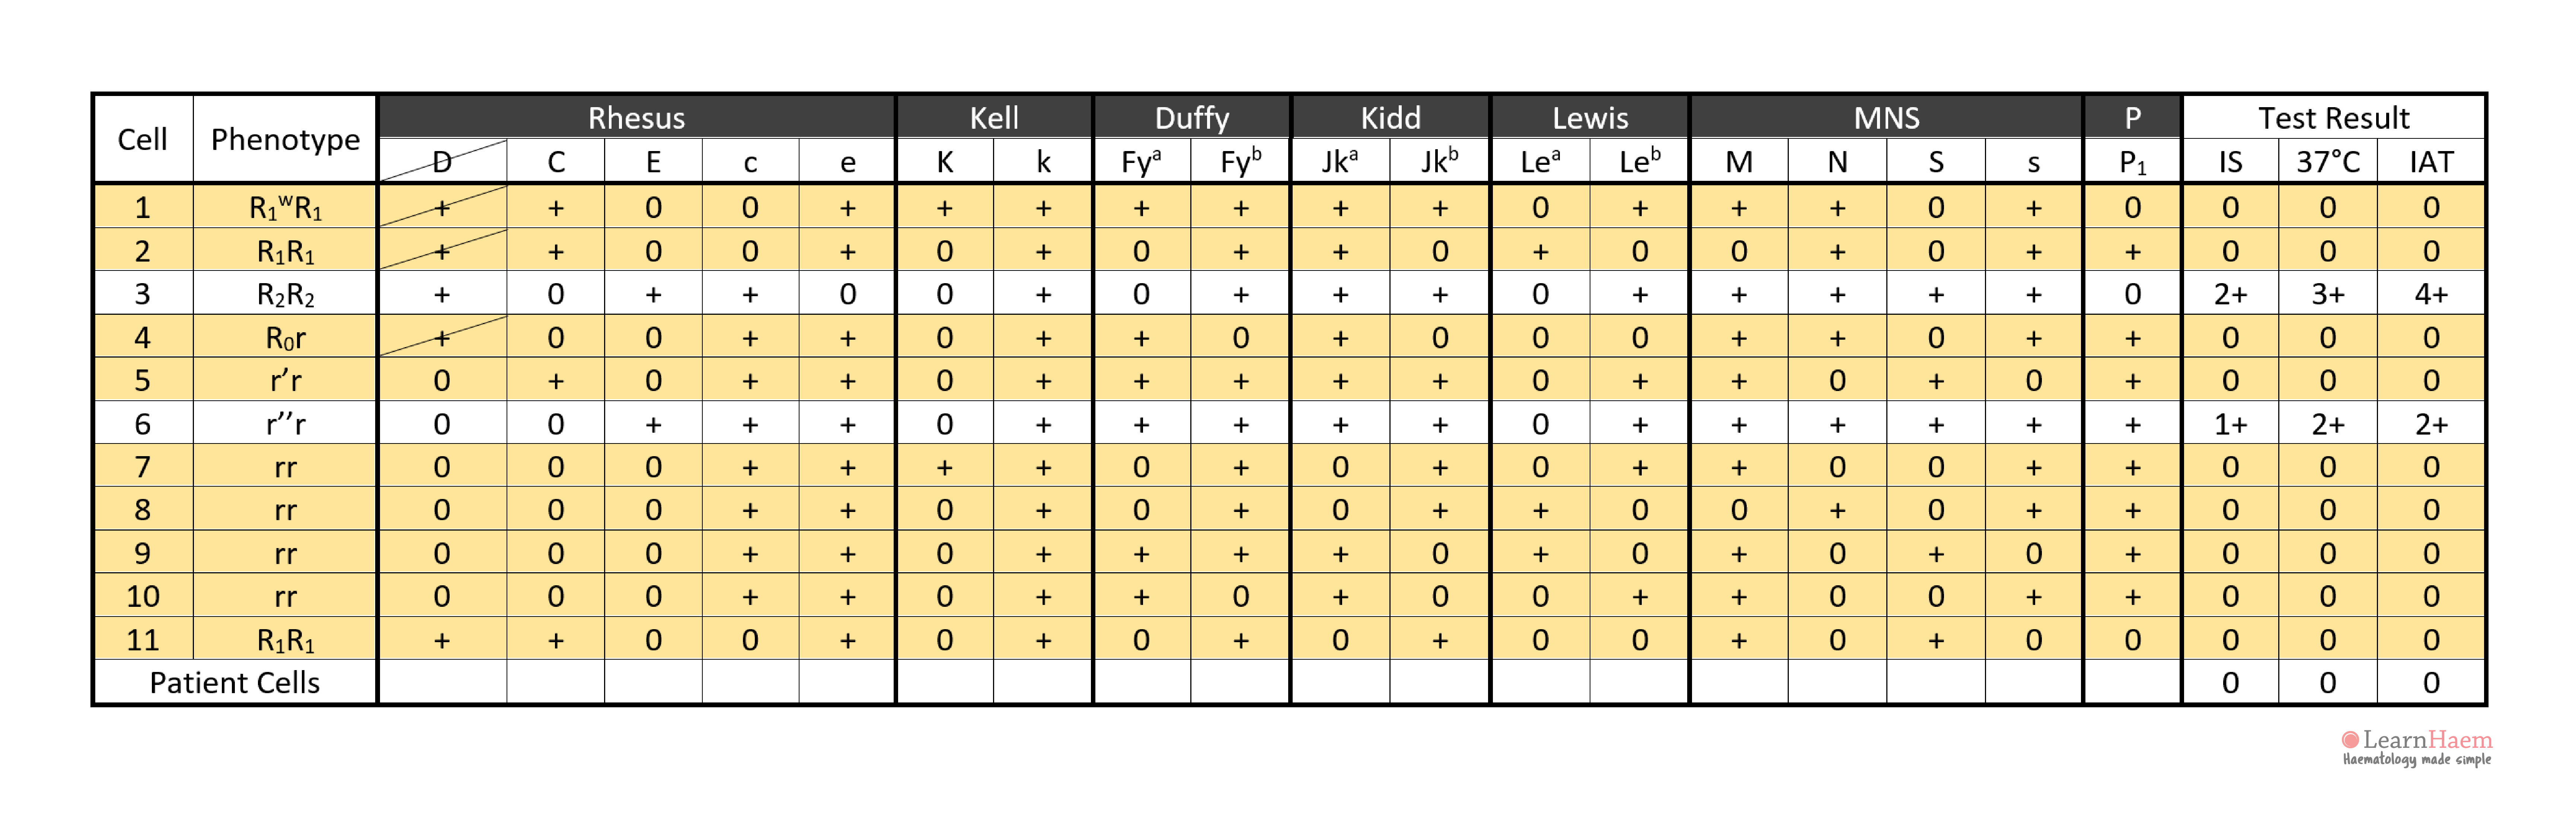
A standard antibody identification panel comprises reagent red cells from at least 8 group O donors. The panel should support resolution of as many common antibody mixtures as possible.
Not all Antibodies are Significant
Step 1: ignore clinically insignificant antibodies. These are typically antibodies which do not react at 37°C.
Look for the Agglutination Pattern
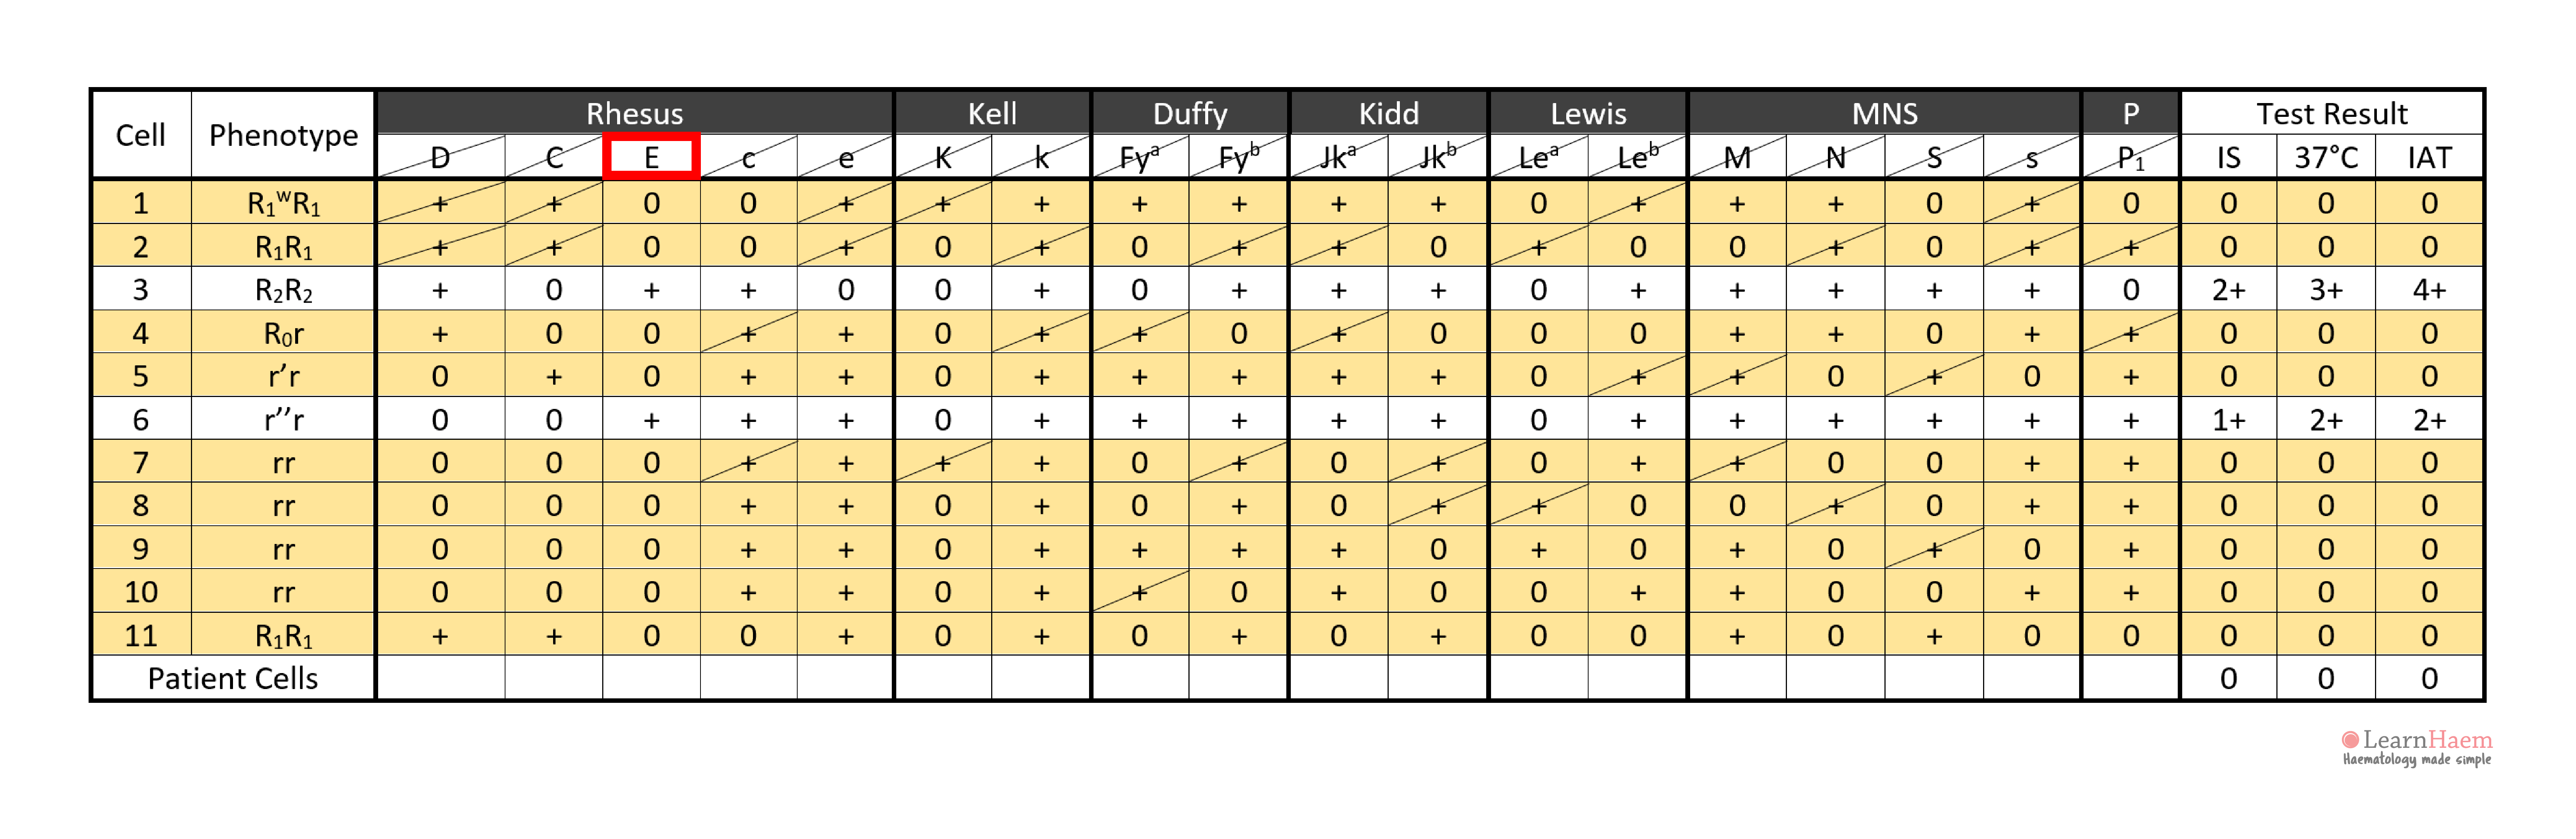
Step 2: note the agglutination pattern (i.e., panel cells which react with the patient’s plasma) and look for common expressed antigens.
These antigens should not be expressed on cells with no reaction with the patient’s plasma.
This gives an idea of the possible antigen target of the culprit antibody.
However, exclusion of other antibodies is required for confirmation.
In the example, the antibody is likely to be anti-E because cells 3 and 6 express it, corresponding to the reactive IAT. Antibodies such as anti-c and anti-k are not likely candidates because c and k are expressed by panel cells with no reaction (e.g. cells 4, 5, 7, 8, 9).
Excluding Other Clinically-Significant Antibodies
Step 3: take note of panel cells with no reaction with the patient’s plasma.
Step 4: exclude antigens on panel cells which have no reaction with the patient’s plasma.
Since they do not cause agglutination with the antibody in the plasma, they can be safely excluded the target of the culprit antibody.
When excluding antigens, exclude them on cells which are homozygous for the antigen in question. This ensures that weaker antibodies which exhibit dosage effects are not inadvertently ruled out.
Exceptions can be made for anti-K, which is very rarely homozygously expressed.
In the example, anti-D can be excluded because cells 1, 2 and 3 are express the D antigen, yet have no reaction with the patient’s plasma.
Step 5: exclude all other antibodies by checking each antigen. A minimum of two (ideally three) cells which are homozygous for the antigen in question should be used to exclude it.
In this example, all clinically-significant antibodies except anti-E have been excluded.
Antibody Specificity
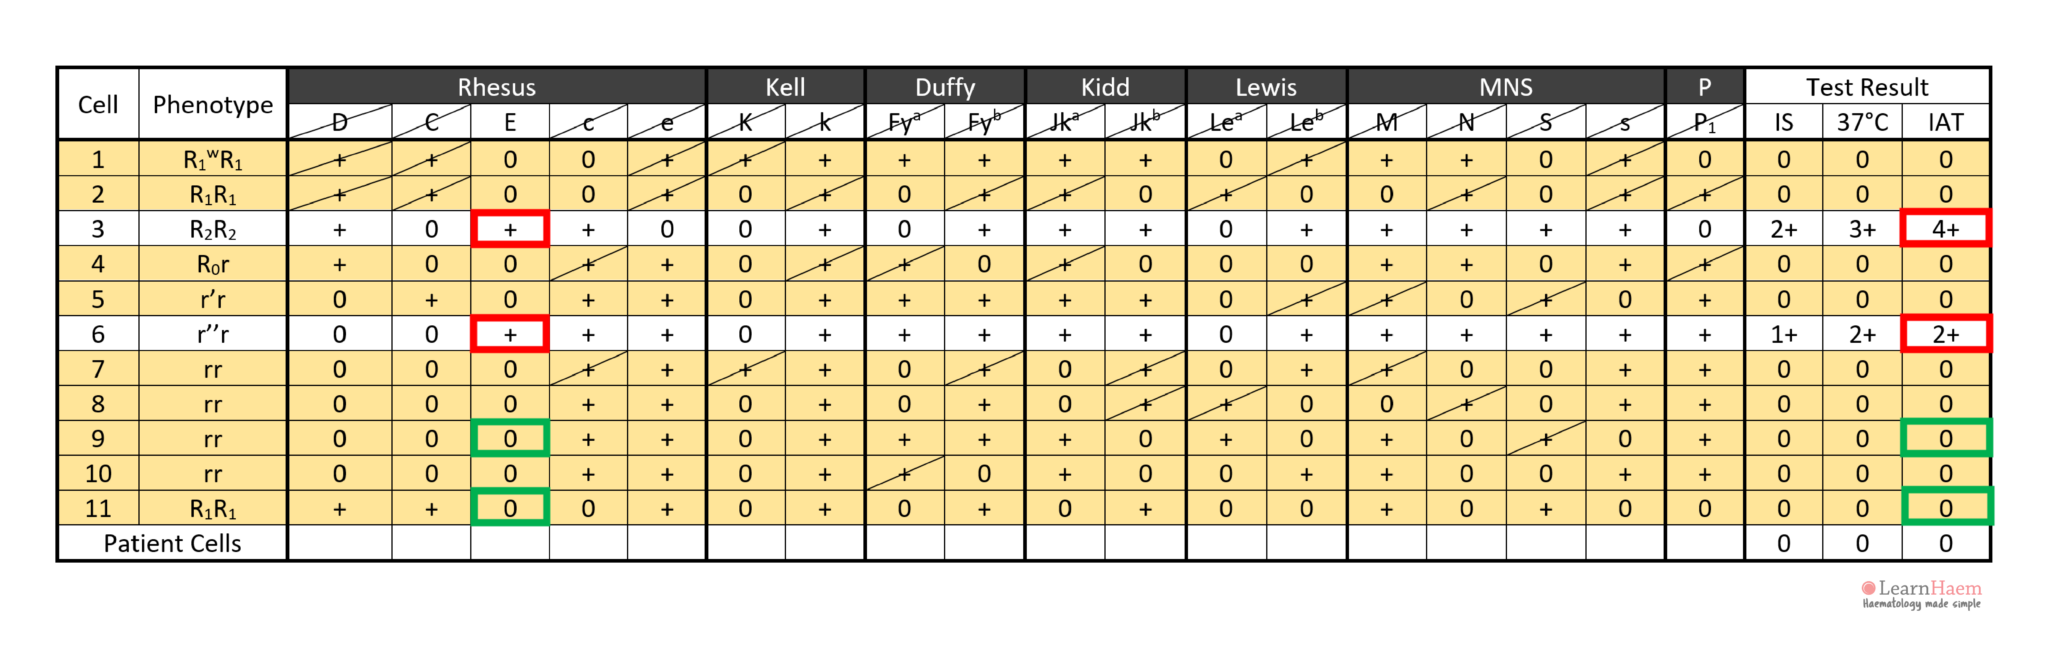
Step 6: assign the specificity of the antibody. This should only be done once two cells expressing the antigen react with the patient’s plasma (red box), and two cells which do not express the antigen are non-reactive with the patient’s plasma (green box).
Technically, confirmation should include phenotyping of the patient’s own red cells, to ensure that they are antigen-negative for the alloantibody target (alloantibodies should not form against self-antigens).
In this example, cell 3 has a strong 4+ reaction at the IAT phase, while cell 6 has a weaker 2+ reaction. This is likely due to a dosage effect, since cell 4 is homozygous for E (DcE/DcE), while cell 6 is heterozygous (dcE/dce).

Step 7: check that the antibody identification results do not conflict with the results from the antibody screen. This guards against mistakes made by inadvertently carrying out antibody identification on the wrong sample.
Cell 3 has a 4+ reaction, not cell 4.
Thanks for the input, we have reformatted this page to make the information presented clearer.
the explaination is very easy to follow
Very clear illustration. Only minor error as picked up by Sylvia but we can see that and learn from what you want to put across to us. Many thanks for all your effort to help us.